Photography Tutorial: How to Photograph Flowers

As a longtime portrait and wedding photographer, my favorite subject to photograph has long been flowers. Yes, flowers. I really do love photographing people but when you are working with people all day every day, having a subject that doesn’t talk back, doesn’t throw a temper tantrum and just sits there looking pretty, is a nice change of pace.
Now that spring is here and summer is just around the corner, everything is either in bloom or getting ready to be. So today, to get back into the Saturday photography habit, today I’ll talk about how to photograph flowers.
You may have read other tutorials on the internet where they talked about the need to have a tripod, a cable release, a macro lens and all sorts of other assorted pieces of equipment. Well, those are all nice and they certainly don’t hurt, but today I’m going to focus on how to photograph flowers with the tools you already have on hand. All of the photos in this post were taken with a hand-held camera, in natural light, with a regular lens. Since I have a library of a few thousand flower photos at this point, you’re probably wondering how I can be so sure of that. One, I don’t like being confined by a tripod. I use it when it’s necessary (usually for sunset & sunrise landscapes, lightning and things like that), but for the most part it doesn’t get used when I’m out and about—I like to travel light. Since I’m not using the tripod, I also don’t need the cable release (but I have one for when I do need it). And since these are all digital images, I haven’t had a macro lens or extension tubes or close-up filters since I switched to digital. My film equipment was old enough that I couldn’t switch any of it over, so these are really all done with a standard lens—and minimal post-production cropping, if any.
Enough of all the intro stuff, let’s get on to the fun.
To photograph flowers, a zoom lens is helpful. If your camera has a macro mode, you’ll want to use it for some of your flower photos, but not necessarily for all of them.
There is no one type of lighting that is ideal for flowers. I have photographed flowers in mid-day, in early morning, under bright sun, in diffused indirect lighting, in total shade, and in my kitchen with window light and sometimes with regular incandescent light. Different lighting produces different effects and I’ll give you a few tips for how to maximize different light.
Botanic gardens are a great place to start with flower photography. So are public parks, shopping center flower beds (you can see some great examples of tulips I photographed at a local shopping center here) and your own backyard. But don’t limit yourself to cultivated flowers. Take your camera and go on a hike. Keep your eyes open for all the floral photo ops in the wilderness. While I will profess a great fondness for tulips and lilies, I love photographing wildflowers even more. Wherever you photograph, be mindful. Don’t trample other plants in your haste to get that perfect blossom. If you’re photographing in a public place, like a park or business area, pay attention to the people around you and don’t make yourself a hazard.
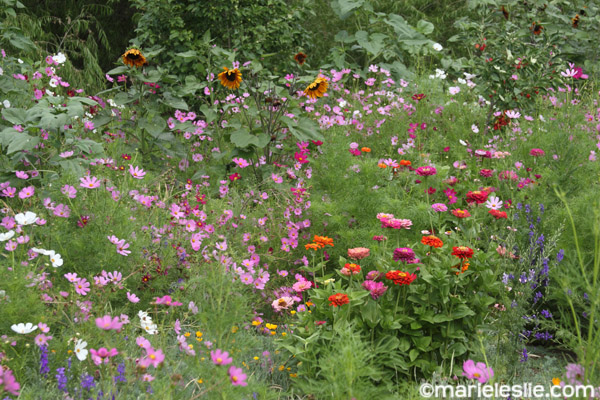
Don’t be afraid to experiment. Photographing flowers is the one time I will happily confess to being a charter member of overshooters’ anonymous. Flowers generally only bloom for a short time and you want to take advantage of that. Try different angles, different camera settings and different techniques. After all, you’re not likely to get another shot at that bloom for another year. Shoot both with a wide aperture for a very shallow depth of field to focus on one blossom or even a portion, or use a smaller aperture to photograph a large garden like this one.
As for post-processing, have a little fun with it. There’s no need to overdo it, but I will admit I nearly always give my flower photographs a little saturation or vibrance boost. Digital cameras tend to be a little more flat in their capture and so a slight levels adjustment and saturation boost will help nearly any flower image. In addition, this is art. It doesn’t have to be an exact photojournalistic representation, so if you want to play with your photos a bit, go right ahead. Just remember to save it as a copy so you have your original intact in case you don’t like your artistic endeavors. You can see the before-and-after on this one, as well as other flower examples on the Marie Leslie Media Facebook page here.
There are a few helpers I bring along. Sometimes I get to bring a human helper and that’s the best. He carries my bag and sometimes sees things I miss. When I am going out to photograph flowers, in addition to my camera I like to bring a black piece of cardstock and a white piece of cardstock. I use the cardstock if I want to try making a quick plain background to isolate the flower. I also bring reflectors. I have several different sizes, but for flower photography, I generally use my 12″ and my 30″ reflectors. One is white on one side and silver on the other and the other reflector is white and gold (I rarely use gold). These are not only helpful for adding light where it’s needed, but for blocking light as well (this is where the human helper comes in handy). A small spray water bottle is also nice to get water droplets on your leaves and petals. And that’s about all I bring.
Before you start shooting, take the time to really look at your subjects. Examine it from all angles.Don’t be afraid to get down low, even lying on the ground when needed (another good reason to have a human helper–he keeps me from getting stepped on or bumped in busy places).
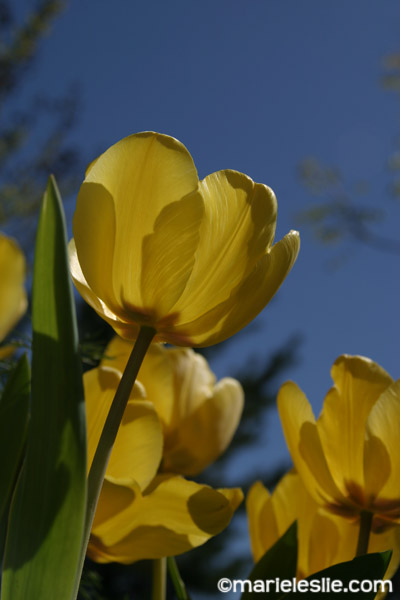
Backlighting is one of my favorite styles for flowers. It really shows off their color and texture as in this image of tulips I photographed in a park in Oklahoma City. Put the flower between you and the sun. This technique can also help get rid of distracting backgrounds because you’re often shooting up at the sky. Yes, I had to lie on the ground, but don’t you think it was worth it?
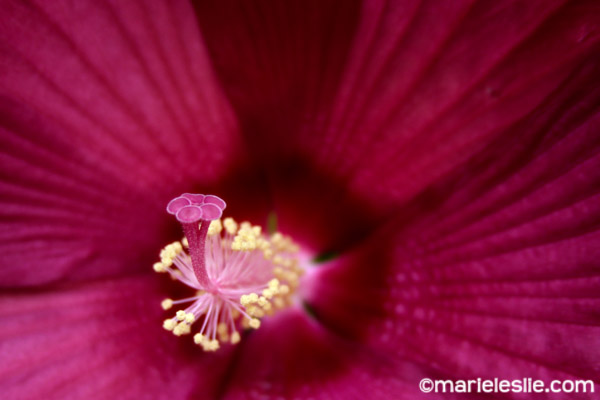
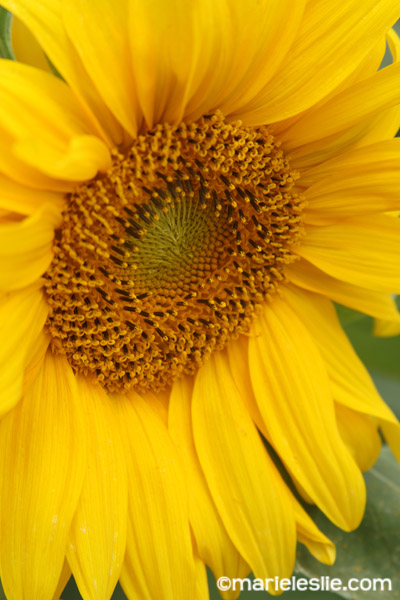
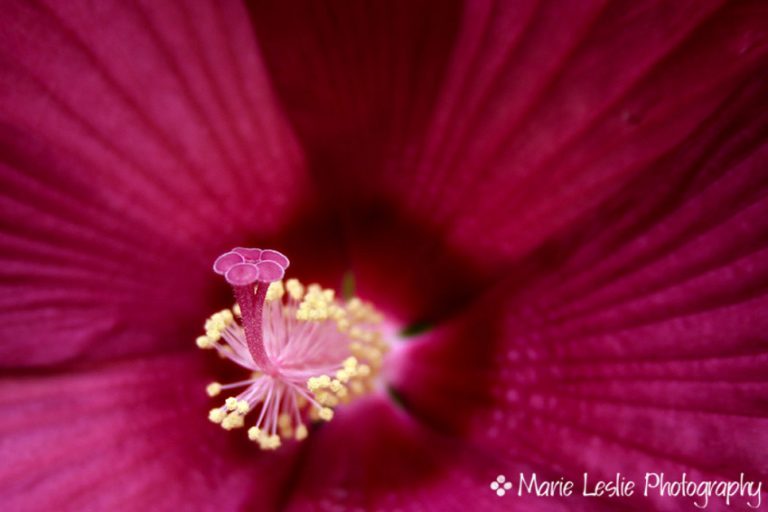
Move in close. I promise these pictures were taken with a regular lens. If you have a macro, great. If you have the “close-up” setting on your camera you can use that. For me, I have found it often works very well for me to back up just a bit and then fully extend my zoom. That is how I photographed the hibiscus above and how I photographed this sunflower on the edge of a farmer’s field (there are more photos of the field on my Facebook page).
Flowers are full of amazing detail and I love to capture every bit of it. This was also taken on an overcast day, giving it the soft light and allowing all the details to be seen without any blown-out highlights.
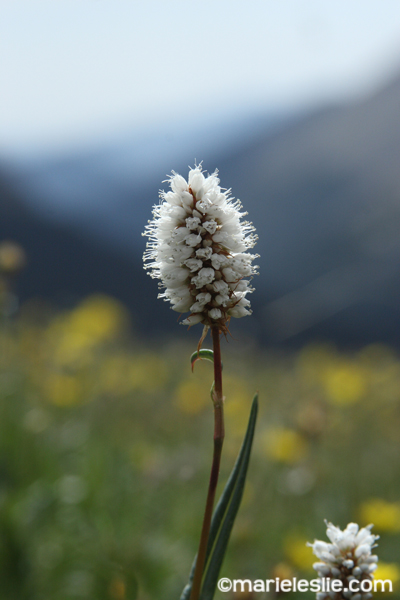
Admittedly though, photographing flowers in a garden or farm is like shooting fish in a barrel. I find that getting out and finding flowers growing naturally is a fun challenge. To me, wildflowers are also some of the most beautiful. Here are two examples from Rocky Mountain National Park. They are above the timberline, so they are really very tiny flowers. I was flat on the ground on the edge of a walking trail for the first one. It was on a sunny day and I used a shallow depth of field along with my zoom fully extended to isolate the flower from its background, while still allowing you to be able to recognize that it is in a meadow high in the mountains. If I had used a smaller lens opening, the flower would have been lost among its companions and would have blended into the background.
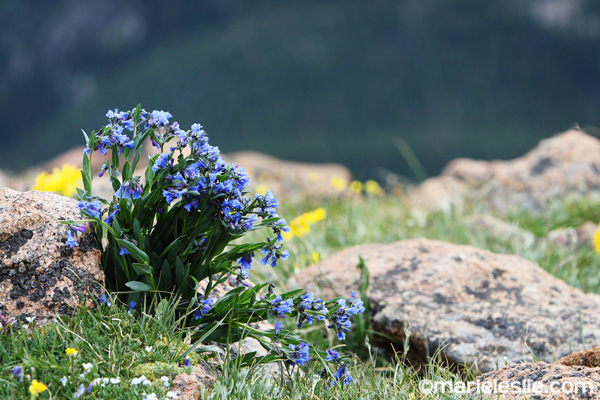
For this image, I was low to the ground, but I gave it slightly more depth of field (a smaller lens opening) to keep more of the plant in focus and to contrast the delicate flowers with the lichen-covered rocks it was growing among. Again here, too much depth of field would have kept the background rocks in focus and would have de-emphasized the flowers as the central focus of the image.
This nile lily was photographed using a very narrow depth of field and a fairly high shutter speed. It was a very sunny day and the foliage behind it was distracting. I wanted all the detail of the flower, but not all the background plants, so I used my reflector to put some additional shade on the background and, combined with the higher shutter speed and smaller lens opening, it had the effect of minimizing the distractions.

This is an example of using the cardstock to isolate a flower from its background. I loved this tulip and really wanted to focus on it, but there were lots of distractions in the background. I just held my white card behind the flower and photographed it. I did extend the background in Photoshop so I could have additional white space to match my vision, something I couldn’t quite manage in camera.

In your quest for the perfect blossom, don’t forget to pay attention to the other elements around you. Leaves, tree trunks, grasses and other elements also make fascinating images. Here is a small section of a large leaf that I zoomed in on when I was photographing at a botanic garden. I love the texture, pattern and color of this softly backlit leaf.

And finally, have a little post-photography fun with your photos. This rose is probably my favorite flower print ever. I have it displayed in a number of exhibitions and sold quite a few copies over the years. I used a technique in Photoshop (not a filter) to give it a painted look. It received high praise from one my early mentors, probably the critique that meant the most to me, as it was the first image I ever entered in a professional competition.

So, now that you know you can do this without a major investment in equipment, what are you waiting for? Get out there and photograph some flowers. Have some fun and exercise your creativity.
Don’t forget. You can see more examples and tips on flower photography on the Marie Leslie Media Facebook page here.
If you have any questions about photographing flowers–or anything else–feel free to leave them in the comment section below or ask me on my Facebook or Google+ pages. If there’s a topic you’d like me to cover in a future tutorial, let me know about that as well via the comment section below.


I also love to take photo of flowers !!! In the wedding of my friend mostly I would like to use photograph flowers !!! The images you are produce that is looking too beautiful..Thanks